 One of the pleasures of Microsoft Word is how you can combine innocuous basic tools to accomplish surprisingly large tasks—to make Word work for you, not against you. Those tools tend to be present participles: finding, moving, selecting, and so on.
Each of these -ings saves time, but the real payoff comes when you combine them to emulate how you’d approach a typical writing or editing task—with Word doing the heavy lifting.
One of the pleasures of Microsoft Word is how you can combine innocuous basic tools to accomplish surprisingly large tasks—to make Word work for you, not against you. Those tools tend to be present participles: finding, moving, selecting, and so on.
Each of these -ings saves time, but the real payoff comes when you combine them to emulate how you’d approach a typical writing or editing task—with Word doing the heavy lifting.
Consider the task of checking literature citations in a manuscript—a set of labor-intensive, time-consuming tasks. To make Word work for you in this scenario, the thought process goes like this:
- Copy the bibliography into a new window for ease of reference, then display that document beside the manuscript window so that you can consult it as you work.
- Identify a pattern that represents a citation, and develop a way to repeatedly find instances of that pattern.
- Check each citation that you find to confirm that the author, date, and other information are correct.
- Finish your literature check by identifying references that haven’t been cited or that appear in incorrect order.
This isn’t rocket science, since it involves only four simple steps. But it will seem complex the first time you do it because you’re setting up Word to perform these steps. Once you’ve completed the setup, you’ll find that the four steps are logical and easy to remember. So take a deep breath, gather your confidence, and hang in there until we’re done. You only need to learn three built-in tools: how to record a macro, how to assign a keyboard shortcut to that macro, and how to find a search term.
Note: Most editors use Word for Windows (WinWord), but I’ll also provide instructions for the Macintosh version (MacWord). As you’ll see, most MacWord commands replace “Control” and “Alt” with “Command” and “Option”, respectively. I’ve noted any exceptions.
Copy the bibliography into a new window
The goal of this step is to make the references section available for consultation while you work. (You can also do this with style sheets and other reference information.) To do this manually, perform the following steps:
- Move to the start of the bibliography.
- Hold down the mouse button and drag the cursor downwards until you reach the end of the bibliography.
- Copy the text (in WinWord, Control+C; in MacWord, Command+C).
- Open a new window (in WinWord, Control+N; in MacWord, Command+N) and paste the bibliography into that window (in WinWord, Control+V; in MacWord, Command+V).
- Save the bibliography window (in WinWord, Control+S; in MacWord, Command+S).
- Reposition the manuscript and reference windows so you can see the bibliography beside the manuscript window: in WinWord, click the “Arrange All” button in the Ribbon’s Review tab; in MacWord, Window –> Arrange all.
- Resize and reposition the windows if so desired. For example, I usually work with the manuscript window at full width and the references in a narrower window beside it.
This is easy to do manually, but since the steps are identical each time, why not record a macro to accomplish this for you? For details on recording macros, see Lyon (2011) or Chapter 11 in Hart (2016). Alternatively, copy the macro text I’ve provided in Appendix 1 and paste it into the macro editor:
- In WinWord, select the Ribbon’s View tab, then click the Macros icon. In MacWord, open the Tools menu and select Macro, then Macros.
- In both versions, type a memorable name for the macro (e.g., ShiftReferencesToNewFile). Note that you can’t have spaces in a macro name, so using interior capitalization makes the name easier to read.
- Click the Create button to open the macro editor. You can now copy the text from Appendix 1 and paste it into the macro editor.
- When you’re done, save the macro and close the macro editor: in WinWord, Control+S followed by Alt+F4; in MacWord, Command+S followed by Command+Q.
In addition, why waste time opening the macros dialog box each time you need to do this? Instead, assign a keyboard shortcut that runs the macro:
- In WinWord, open the File menu, select Options, and select the Customize Ribbon tab. Click the Customize Keyboard button at the bottom of the dialog box. In MacWord, open the Tools menu and select Customize Keyboard. The rest of the steps are the same in both versions:
- Under the Categories heading, select Macros; under the Commands heading, select the name of the macro you recorded.
- Position the cursor in the Press New Shortcut field and type the new keyboard shortcut. I use Control+Shift+R in both WinWord and MacWord (memory aid: Control References location; Shift them into a new window).
- Resize the text in the bibliography window to fit as many references as possible on the screen simultaneously, thereby reducing the amount of scrolling required.
Identify a pattern that represents a citation
The next step is to identify a recurring pattern that indicates the presence of a citation. In systems based on numbered citations, that pattern may resemble [1] or a superscripted number, both of which you can search for. Since the author–date system is particularly common, let’s consider what the pattern looks like in that system:
- The pattern we’ll be searching for is a year, which in most cases consists of four digits in a row. (If you’re editing history manuscripts, you may instead need to search for 2 or 3 digits in a row.)
- The code Word uses to represent a digit in the search dialog box is ^#; thus, a year would be four of those codes in a row (^#^#^#^#).
It’s tedious to type that string each time you want to find instances of that pattern, so why not record a macro to do the work for you? Again, rather than having to access the macros dialog each time, record yourself doing the following steps: opening the search dialog box (Control+F in WinWord, Command+F in MacWord), typing ^#^#^#^# in the Find What field, clicking the Find Next button, and then closing the dialog box. Finish by binding the macro to a keystroke, as I described in the previous section. I use Control+Y in both WinWord and MacWord (memory aid: Control cursor position; move to next Year).
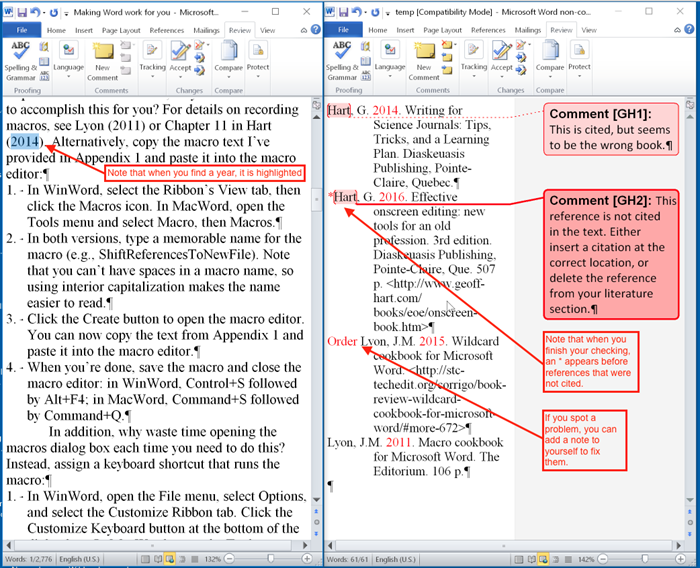
An illustration of what the screen looks like while you’re checking literature citations. The left pane shows the manuscript window, with a found term (the year of the citation) highlighted. The right pane shows the list of references, copied into a new document and displayed beside the manuscript. I’ve inserted two comments for problems with the citations that I’ll need to transfer into the manuscript: (1) the citation appears to refer to the wrong book and (2) one of the references does not appear to have been cited. Also note that I’ve added two reminders to myself for things I’ll need to check: the asterisk beside the Hart (2016) reference means that I did not find it cited anywhere in the text, reminding me to confirm that it really wasn’t cited, and one of the Lyon references is out of order.
If you accidentally jump one year too far, press Word’s keyboard shortcut to move back to the previous instance: in WinWord, Control+PageUp; in MacWord, Command+PageUp. Press Control+Y again or press Control/Command+PageDown, Word’s keyboard shortcut to find the next instance, to find the next citation.
You can apply the exact same technique to any other kind of repetitive search task, such as finding figure and table captions to ensure that the sequence is correct (i.e., no duplicated or omitted numbers). For more details on defining search terms, see Lyon (2015) or Chapter 8 in Hart (2016).
Check each citation
The next step is to find each citation and confirm that the author, date, and other information are correct; for example, you may want to confirm that the title sounds right for the subject it is being cited to support. The procedure is simple:
- First, move to the start of the manuscript, then press the keyboard shortcut you defined (Control+Y) to find the first literature citation. If you’re lucky, it will already be visible in the bibliography window; if not, you’ll need to shift to that window and scroll until you find the reference.
- Second, confirm the author, date, and other details. If anything is wrong, select the citation in the manuscript and insert a comment to explain the problem (e.g., different spellings of an author’s name, the wrong year). If the reference is missing, report that problem.
- Third, add a note in the bibliography window for anything you need to do when you’re finished checking the citations. For example, I add the word “order” if the reference is not in correct alphabetical order, and I retype an incorrectly spelled name to remind me to change it in the manuscript.
- Finally, type an easily visible checkmark such as * before each reference to confirm that it has been correctly cited somewhere in the manuscript.
- Repeat until you reach the end of the manuscript.
If you’re dealing with a long bibliography, which will require considerable scrolling of the bibliography window, there’s a faster way:
- Select the author’s name (the first author if the citation includes multiple names), and copy it (in WinWord, Control+C; in MacWord, Command+C).
- Switch to the bibliography window by clicking the cursor in that window, or by using a keyboard shortcut: in WinWord, press Alt+Tab; in MacWord, press Command+` (the accent to the left of the 1 on the keyboard).
- Open the Find dialog box (in WinWord, Control+F; in MacWord, Command+F), and paste in the author’s name (in WinWord, Control+V; in MacWord, Command+V).
- Click the Find Next button, then close the dialog box.
- If you haven’t found the correct reference (e.g., when there are multiple references by an author), press Word’s shortcut to find the next instance of that name (in WinWord, Control+PageDown; in MacWord, Command+PageDown).
Once again, copying and pasting the author name each time can be tedious, so why not create a macro? Unfortunately, due to a quirk in Word, you can’t record the keystrokes to copy a word and paste it into the Find dialog box. I’ve provided the necessary macro code to do this in Appendix 2.
Check for uncited references and other problems
When you reach the end of the manuscript, most of the references should have a checkmark beside them, indicating that they’ve been cited somewhere and that you’ve confirmed the citation details. Those that lack a checkmark may be uncited, or you may have just missed them. To confirm this, use the same Copy/Find shortcut that I described in the previous section, but this time switch from the bibliography window to the manuscript window before you begin your search. If you find the citation, add a checkmark in the bibliography window; if you don’t, you’ll eventually reach the uncited reference in the bibliography at the end of the manuscript. You can then insert a comment to remind the author to add a citation or delete the uncited reference. As you work through the bibliography window, you may also find notes such as “order” to indicate that the reference appears in the wrong position in the bibliography or “verify” to remind you to consult a library database or other resource (e.g., a publisher’s Web site) to confirm the publication details. Switch to the manuscript window and move out-of-order references to the correct position, or switch to your Web browser and confirm the details.
This works well, but it has two drawbacks that are easy to fix: you have to type a checkmark manually, and it’s easy to miss a reference that lacks a checkmark if you’re scanning visually through the reference list. Instead, why not invert this procedure: add the checkmarks to each reference right from the start, using revision tracking, then delete them as you confirm each citation? In this way, once you’re done, the only tracked changes that remain in the manuscript are checkmarks (e.g., * to indicate that a reference has not been cited) and notes (e.g., “order”, “verify”), and you can move to them quickly using the Next Tracked Change icon in the Ribbon’s Review tab. Appendix 3 contains the necessary code to add the * in the macro for copying the references into a new window.

An illustration of what the screen looks like while you’re working in the macro (Visual Basic) editor. I’ve highlighted the search term, the search direction, and other search options. Editing their properties (e.g., changing the search term, changing the pattern that Word such match) lets you easily revise this macro so that it’s suitable for different searches (e.g., change the search text to “[” to find citations that appear in forms such as [1]). I’ve also indicated where you can paste the text from Appendix III to add asterisks at the start of each reference before you begin checking citations to indicate that it has not been cited.
Making Word work for you
This seems like a lot of work—the first time you do it. Once you’ve done it a couple times, it all becomes quite straightforward, and you’ll be amazed at how much faster and more accurate you’ll be. A small investment of time up-front will be repaid a hundredfold once you start using this method. If you’ve automated the processes I’ve described, you’ll memorize the steps in less than a week of use.
Any other editorial process that involves repeated steps can benefit from a similar analysis. All you need to do is write down the key steps, spend some time thinking about each one to see whether it can be automated, and then invest some time to automate that step. This seems intimidating the first time you try it, but gets much easier with practice.
References
Hart, G. 2016. Effective onscreen editing: new tools for an old profession. 3rd edition. Diaskeuasis Publishing, Pointe-Claire, Que. 507 p. <http://www.geoff-hart.com/ books/eoe/onscreen-book.htm>
Lyon, J.M. 2011. Macro cookbook for Microsoft Word. The Editorium. 106 p.
Lyon, J.M. 2015. Wildcard cookbook for Microsoft Word. <http://stc-techedit.org/corrigo/book-review-wildcard-cookbook-for-microsoft-word/#more-672>
Appendix 1: Macro to move references into a new document
Note: Appendix 3 contains code that you can add to this macro so that when you run the macro, Word adds a checkmark at the start of each reference. You can delete the checkmarks each time you confirm that a reference has been cited. When you’re done, you can use the Find Next Tracked Change icon in the Ribbon’s Review tab to quickly find any uncited references or notes to yourself. The version of the macro that I’ve provided includes a few additional lines of code that find all four-digit numbers in the file that contains the references (i.e., years in most cases) and changes their color to red so you can more easily spot them amidst the sea of black text. If you don’t want to do that, delete the code from the line that begins with “Selection.Find.ClearFormatting” to the “End With” line before “Active.Document”; retain the “Active.Document” line. If you don’t like some of the ways the macro behaves, you can edit the macro to change “True” to “False” or vice-versa. For example, the current version of the macro does not consider the capitalization of the search text (.MatchCase = False), since that’s irrelevant for years. But if you want to modify this text for other searches in which case is important, simply change .MatchCase = False to .MatchCase = True.
Sub CopyReferencesToNewFile()

    Selection.Copy

    Documents.Add DocumentType:=wdNewBlankDocument

    Selection.Paste

    ActiveDocument.SaveAs FileName:="temp.doc", FileFormat:=wdFormatDocument

    Selection.Find.ClearFormatting

    Selection.Find.Replacement.ClearFormatting

    Selection.Find.Replacement.Font.Color = wdColorRed

    With Selection.Find

        .Text = "^#^#^#^#"

        .Replacement.Text = ""

        .Forward = True

        .Wrap = wdFindContinue

        .Format = True

        .MatchCase = False

        .MatchWholeWord = False

        .MatchWildcards = False

        .MatchSoundsLike = False

        .MatchAllWordForms = False

    End With

    Selection.Find.Execute Replace:=wdReplaceAll

    Selection.WholeStory

    With Selection.ParagraphFormat

        .LeftIndent = InchesToPoints(0.5)

        .RightIndent = InchesToPoints(0)

        .SpaceBefore = 0

        .SpaceAfter = 0

        .LineSpacingRule = wdLineSpaceSingle

        .Alignment = wdAlignParagraphLeft

        .WidowControl = True

        .KeepWithNext = False

        .KeepTogether = False

        .PageBreakBefore = False

        .NoLineNumber = False

        .Hyphenation = True

        .FirstLineIndent = InchesToPoints(-0.5)

        .OutlineLevel = wdOutlineLevelBodyText

    End With

    ActiveDocument.TrackRevisions = Not ActiveDocument.TrackRevisions

End Sub
Appendix 2: Macro to copy text into the Find dialog box
Note: Before you run this macro, select the text that you want to paste into the Find dialog box.
Sub FindSelectedText()

Selection.Copy

' Define selection as variable

Dim MyFoundText$

MyFoundText$ = Selection

Selection.Find.ClearFormatting

With Selection.Find

       .Text = MyFoundText$

        .Replacement.Text = ""

        .Forward = True

        .Wrap = wdFindAsk

        .Format = False

        .MatchCase = False

        .MatchWholeWord = False

        .MatchWildcards = False

        .MatchSoundsLike = False

        .MatchAllWordForms = False

End With

Selection.Find.Execute

End Sub
Appendix 3: Adding a checkmark before each reference in the bibliography
Note: In this macro, I’ve used * as a checkmark because it’s easy to type and visually distinct from the kind of text that you’ll typically see in a reference list. If you don’t like that symbol, you can choose your own. In the line that begins “.Replacement.Text”, replace the * with any other symbol that you would prefer to use. To add this feature to the macro in Appendix 1, copy the code and paste it into the line before “Active.Document”. If you want to run this code as a separate macro, simply add the code “Sub AddCheckmark” as the first line of the macro text in this appendix and “End Sub” as the last line. (Don’t type the quotation marks!) Before you run the macro, ensure that the text cursor is at the start of the reference list in the bibliography window (insert a blank line if necessary); that ensures the first reference in the list will also have a checkmark added.
    Selection.Find.ClearFormatting

    Selection.Find.Replacement.ClearFormatting

    With Selection.Find

        .Text = "^p"

        .Replacement.Text = "^p*"

        .Forward = True

        .Wrap = wdFindContinue

        .Format = False

        .MatchCase = False

        .MatchWholeWord = False

        .MatchWildcards = False

        .MatchSoundsLike = False

        .MatchAllWordForms = False

        .MatchByte = False

        .MatchFuzzy = False

    End With

    Selection.Find.Execute Replace:=wdReplaceAll